I’m writing this sitting on a Boeing 777, heading for China where Lina and I will spend the next year teaching in a Chongquing Maple Leaf High School. Before my blog is diverted into a series of photographs of confusing signs, strange vegetables, and tales of whatever it is we get up to there I have some unfinished business to write about.
Here’s the story of an Englishman and an Irishman went to learn to build bicycles.
Conor and I spent two weeks together living in a teepee during the cool of the morning and the heat of the afternoon commuting into and (just) out of Ashland Oregon. The purpose of all this was to learn how to weld and more specifically how to build a bike frame. The United Bicycle Institute has been running frame building courses for many years and I have been intending to get on one for around 5 years, but It turned out that 2011 was the year I finally made it. I wanted to do the Tungsten Inert Gas (TIG) welding course rather than bronze-brazing as I had heard it was harder (I like a challenge), and whilst less romantic than the age-old craft of brazing it seemed to me that TIG was a great way to get something built strong and fast. Conor had been thinking something along the same lines, we said “let’s do it”, we paid our money, and the rest is history.
I could tell from the first day that the UBI instructors and out “celebrity guest instructor" Paul Sadoff had a wealth of experience to share both in framebuilding and importantly in teaching frame building. One of the first messages was that anyone expecting to come away from the course with their perfect frame was going to be disappointed. As instructor Gary said… “You’re beginner welders; you don’t deserve to do a great weld yet”. Conor and I both took this to heart and set about designing a couple of functional bikes that we could use every day and would serve as our test mule for welding skills. The next thing we learned was that that there really isn’t a right and a wrong way to design, build or fit a bike. One man’s trash is another man’s treasure… but there are established norms that can help you come up with something that will at least work. Paul has his way of doing things, and UBI uses another… we would use the tried and tested UBI methods to allow our class of 8 novice welders to walk away with a functional frame, news skills to practice, and a head full of new knowledge.
Our first 3 days were spent getting to grips with controlling the power of the welder using the foot pedal and establishing the electric arc between the electrode and the work. On scraps of tube we drew lines in the surface using the molten “puddle” produced from the heat of the arc and got a feel for how much you could stomp on the pedal before you burned a hole through the tube. We would all get used to the sinking feeling inside when you saw the edge of the tube glow bright red and curl away from what was supposed to be a joint. To better control the heat of our weld we learned to use the pulser, a clever feature on the welders which allows you to set a cycle of strong pulses of power and pauses which prevent so much heat building up in the weld area. Once we learned to time the movement of the electrode with the pulses, we could produce a string of weld “beads” along the metal as the puddle moved over the surface. Our last step before actually welding something was to introduce the steel filler rod to the weld puddle, allowing us to actually join things together and fill in all those holes we were burning. Putting all these things together, it was time for some practice.
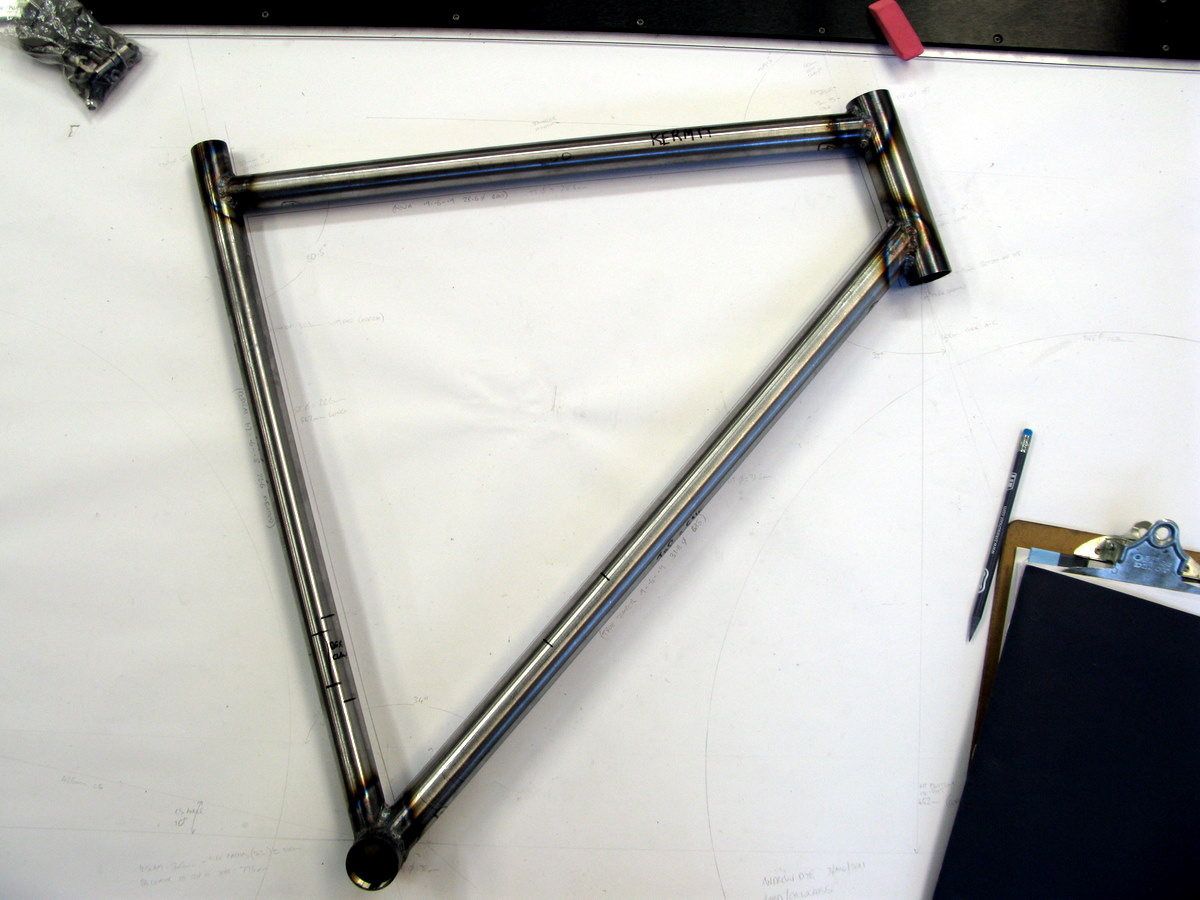
Test piece number 1 was a T-joint of two tubes joined together at around 60 degrees to give us practice at joining tubes as well as welding on the inside of an acute angle. The thin edges of the cut tube were happy to melt away and we had to learn to control the weld arc carefully to place the heat on the thicker metal. The second test piece took things a step further, joining 3 tubes in a “grulon” triangle… complete with tricky inside corners and thin metal at the miters.
 |
| There's a hole in my grulon |

With our test pieces done (or at least patched up well enough to pass our instructor’s inspection) it was time to move onto a real test. Paul told us that an under heated weld could look neat on the outside, but if the metal had not been melted right through the joint it would be weak. An overheated weld could look ugly and weaken the metal around the weld area, but this was preferable to a cold weld as a failure in the joint would happen much later in the frame’s life and more likely form a crack that grew slowly and would be spotted early rather than the frame falling apart at a bad weld. So… our task was to weld a simulated frame joint (bottom bracket to seat tube) and then use a long lever to break it. A positive result would be a break in the tube, rather than a separation of the weld, showing us that the weld was stronger than the tube and therefore not a weak point.


Throughout the first few days, we had discussions on frame design, angles, and fit. We were able to take measurements from an adjustable frame fitting jig or our own bikes and bodies and apply them to our full-scale frame drawings. The logic I followed was to draw in my seat and handlebar position and inseam length on the drawing and fit the tubes of the bike around these points plus the head tube and seat tube angles and bottom bracket height I wanted. With a little tweaking to make it look right to Paul’s experienced eyes I was ready to measure angles and lengths from the drawing to select, cut and miter my tubes. Tubing choice was a compromise of weight, strength and ease of welding which fitted with the theme of my frame being a good compromise of all factors, with the hope of coming out with something rideable. We had all learned that our first frame was not the one to try and be too clever or inventive… better to leave that for our 3rd, or 4th… or 5th.
On our fourth day as bike builders we made the first weld on our first frame. The bottom bracket shell to seat tube joint only required one miter made with a hole-saw on the vertical mill, the first of many we would make in the process of building our frames. Making the first weld was a little like jumping into the freezing blue lake Conor and I swam in on our ride the week before… the anticipation was crippling, but once the torch was on there was nothing to do but get on with making the best weld we could. The best weld I could make was not very impressive at this point, but following Paul’s advice I got a lot of heat into it and things looked pretty solid.


The next 4 or 5 days of work followed a cycle of demonstrations of the fixtures we would use to hold the various parts of the frame together while we welded, how to measure, clamp, and miter the tubes, and all-importantly an inspiring display of fast and precise welding from Paul (under the watchful eye of the class). Paul and all the UBI instructors were extremely helpful, entertaining, and attentive through the intense days of cutting, filing, clamping, and welding. My confidence in welding was growing and I really enjoyed how free from flames, smoke, or fumes the process of TIG is. With the weld shielded by the invisible cloud of argon flowing from the torch there and no sparks (except when to do something wrong), and everything is clean and dry throughout the process. The wear and tear on our nerves showed throughout the days and Conor and I were glad to commiserate our mistakes and celebrate our victories over coffee, beer, a swim in the reservoir, or riding our bikes. We were glad for the weekend off and a chance to ride the trails overlooking Ashland and regain our composure for the final week… by the end of which we had to be finished.

The back end of our frames proved to be the real challenge, which explains why UBI leave this until the 2nd week of the course. More drawings allowed me to work out the best shape of chainstay to allow clearance for fenders, the biggest tires possible, and the drivetrain on the opposite side. It was a fine balance to come up with something that allowed all the parts I wanted to work together to fit into a confined space, but with some sage advice from Paul I was able to come up with a configuration that looked like it would work. The most complicated (and frustrating) fixture was used to clamp the chainstays to the rear wheel dropouts and weld them in place… then the frame went back in the big adjustable jig to have the chainstays attached.

My frame now really resembled a bike, and it was even possible to put a rear wheel in place. This served the purpose of checking the alignment of the back end of the frame. Ham-fisted setting up of the fixtures and distortion from the heat of welding left things a bit wonky on my frame, but it was surprisingly easy to manhandle the chainstays straight before fixing them in place with the seatstays. My choice of seatstay tubes was again a compromise of tire and fender clearance, combined with my wish to use old-school cantilever brakes. My combination of road-style straight chainstays and cyclocross-style S-bend seatstays allowed all the things I wanted to fit on the frame to work in theory, so that’s the way Kermit developed (by now most of our frames had gained names). Attaching the seatstays was another awkward procedure involving some trial-and-error mitering to get a perfect (or at least acceptable) fit, and trying to clamp everything still while I tacked the tubes together. At one point I had to get a helper to flex the tubes into position while I made the tack and the stresses in the metal relaxed. The rear triangle was the greatest demonstration of frame building as an art rather than a science. With so many variables and heat distortion working to twist the frame apart as you weld it, having the “feel” or “knack” as us English folks would say seems to be the key to success.
Several of us in the class were able to get our frames all together with 2 days of the course left to go, whilst others hit problems requiring a little re-drawing or modification of the frame design to get things to work. However, despite having something that looked like a bike I was hardly home-free. At some point I had failed to align the rear end of the frame properly and was left with the rear wheel sitting at a strange angle. This was not what I wanted and it was too late for any more manhandling (or “cold-setting” if you want to make it sound proper). Luckily Paul had the suggestion of filing metal away from the dropouts, allowing the wheel to sit straight and then using the welder to build back the metal on the opposite side to the wheel would stay in place. An afternoon of filing and unconventional welding later, my frame was looking much better and I was ready for the finishing touches.
Whilst I appreciate the elegant simplicity of bikes that are not festooned with every bracket, trinket, and contrivance going… this bike needed to be able to carry fenders, a rack, and some water bottles. Working in Our Community Bikes has given be a loathing of poorly thought out attachments for these things that require bending of brackets, plastic clips, or other paraphernalia to get them attached. I want to be able to drill a hole in my fender and bolt it straight on. I think Paul was a little mystified by my keen attention to the placement of fender bridges and attachment holes on the frame, but he humored me as I got the hang of silver-brazing these things all over the place. It’s worth noting at this point that I disliked silver brazing very much. Sure, you get a nice neat joint and it’s much easier than welding… but all that messy flux, the soot and smoke and the big flame of the torch? Yuck. I’m going to weld them on next time if I can learn to weld such tiny things successfully.

With my accessory attachments on and the flux cleaned away, all which was left was a round of reaming, facing, and tapping to clean up the threads and other surfaces of the frame where parts would attach. My first frame, Kermit, was done! Fast forward a couple of weeks, one wedding, several aeroplane journeys, and a return to Vancouver I proudly showed off my creation to anyone who cared… and some who didn’t. I thought Kermit would be languishing unpainted and unridden in storage until summer 2012 when Lina and I will return from China, but Conor had other ideas. I had heard that YESS in nearby Surrey would powder-coat bike frames, and powder-coat was the finish of choice for an environmentally conscious bike builder who wants a durable finish. Conor had contacted YESS and arranged to take our frames over on Friday morning where they would be done in an hour. An hour? Unbelievable. Struggling to accept that it could be this easy I couldn’t wait to see what Conor would bring along to our leaving party that evening. So… on Paul and Angie’s excellent patio Kermit and I were re-united. Kermit is a splendid green and the man at YESS even plugged all the holes to stop powdercoat getting into placed powdercoat shouldn’t be. So Kermit is still unridden, but at least no-longer naked. Kermit’s maiden voyage will hopefully be in August 2012 and l have a year to think up somewhere appropriate to go…
